
If you are an avid WooCommerce user and you wish to branch out and offer memberships on your WordPress website, look no further. The free Simple Membership Plugin and the WooCommerce Integration Addon will allow you to offer memberships while still accepting payments via WooCommerce. If you aren’t familiar with WooCommerce, or the Simple WordPress Membership plugin, we will explain in detail why both these plugins are used globally by WordPress website owners.
WooCommerce and Simple WordPress Membership
WooCommerce and Simple WordPress Membership are both free plugins available on WordPress.Org. WooCommerce is the leading eCommerce solution for WordPress powered websites and SWPM is among the most supported and maintained membership solutions. These plugins both work well alone, although with the help of the WooCommerce Integration Addon, selling memberships to restricted website content using WooCommerce becomes a possibility.
“WooCommerce is a flexible, open-source eCommerce solution built on WordPress. Whether you’re launching a business, taking an existing brick and mortar store online, or designing sites for clients you can get started quickly and build exactly the store you want.”
“A flexible, well-supported and easy-to-use WordPress membership plugin for offering free and premium content from your WordPress site.”
WooCommerce Integration Addon:
“This addon can be used to accept membership payment via WooCommerce plugin.”
If you currently sell products or services through the WooCommerce platform, offering memberships using the same platform is ideal. This allows your customers to add a membership to the same cart as other products or services that you may have for sale. Just like any other product or service you sell through WooCommerce, a membership can be added to the cart and checked out with using the WooCommerce payment gateway that you have configured.
Why Should I Use WooCommerce to Accept Payments for Membership?
Using Simple WordPress Membership, you can accept payments for a membership via PayPal or Stripe without the need for an extension or addon. While this works well for the majority of users, others may wish to accept payments with WooCommerce to create a seamless checkout for their potential customers. The SWPM team created the WooCommerce Integration Addon to meet these users needs.
The WooCommerce Integration addon allows users of WooCommerce to sell their products, services and their memberships via the same checkout page. It also allows them to use any of the payment gateway options allowed by WooCommerce. Some choose to use this addon as they wish to use Square, Braintree or Amazon Pay. The addon simply creates a branch between WooCommerce and SWPM.
Use the WooCommerce integration addon if you:
- Already use WooCommerce to sell other products or services on your website
- Intend on creating other products or services with WooCommerce in the future
- Wish to accept payments through a gateway offered by WooCommerce
- Are happy with the look/feel of an WooCommerce checkout
- Believe your customers are more likely to proceed to make a payment if they know you are using WooCommerce
- Are comfortable with the support/setup of WooCommerce
How Does the SWPM and WooCommerce Integration Work?
When you use Simple WordPress Membership, WooCommerce and the WooCommerce Integration Addon you create a WooCommerce product just like you would create any other product from the WooCommerce menu. The membership product will have the look and feel of an WooCommerce product. The only difference is, you create a product that is linked to a Simple Membership level. Once a successful transaction has been completed, a notification is sent from WooCommerce to SWPM and the membership account creation and permissions are handled by SWPM automatically.
Considerations When Using WooCommerce to Sell Memberships
If you wish to use WooCommerce to sell memberships that you create using SWPM, you should consider the following:
- The payment gateways you can choose will be set by WooCommerce. This means that some of them may have an additional addon cost.
- If you wish to have a donation type membership through WooCommerce where customers can specify how much they would like to pay to gain membership access, this is a paid WooCommerce addon.
- If you wish to offer membership subscriptions this is a paid WooCommerce addon.
- Simple Membership does not have control over the look and feel of the WooCommerce check-out page. If you choose to use WooCommerce to handle membership payments, all of the customers transaction details are handled, processed and stored by WooCommerce.
Types of Premium Content for Memberships Sold via WooCommerce
The type of content you protect for the intended membership is entirely up to you as admin. The Simple Membership Plugin works to protect page and post content. This means any page or post content can be protected such as images and text. Some admin choose to offer memberships for the following premium content:
- Latest News Posts
- Sporting Information and Betting Tips
- In Depth Tutorials and Demonstrations
- Elite Clubs
- Fitness Information
- Cooking Recipes
- Tech Tips and Tutorials
- Forums
- Coupon and Discount Information
- Dating Profiles
- Community and Hobbies
Selling Memberships Using WooCommerce
Step 1) Installing and Activating Required Software on WordPress Website
Before we go ahead and look at the setup required to sell memberships with WooCommerce you will need the following plugins/addons installed and activated on your WordPress website:
- WooCommerce Plugin (Free)
- Simple WordPress Membership Plugin (Free)
- WooCommerce Integration Addon (Premium)

If you do not have the three pieces of software mentioned above on your WordPress website, you will need to do so prior to continuing. Also ensure that you have the latest WordPress version and your website is free of caching (or caching is handled appropriately).
Step 2) Configuring Required Settings
Complete the general settings required of WooCommerce and the SWPM Plugin.
For the WooCommerce Plugin ensure that you have:
- Set up your Store Address, Taxes, Coupons and Currency Options under the ‘WooCommerce General Settings’ menu.
- Configured your preferred payment gateways under the ‘WooCommerce Payment Settings’ menu.
- Edited emails and ensured the email address is correct within the ‘WooCommerce Emails Settings’ menu.
For the Simple WordPress Membership Plugin ensure that you have:
- Ensured that the from email address is correct within the WP Membership Email Settings menu.
- Familiarized yourself with the WP Membership General and Advanced Settings Tabs.
Step 3) Setting Up Membership Level and Protecting Content
Before you go ahead and create a WooCommerce product, you will need to create the membership level and protect your website content.
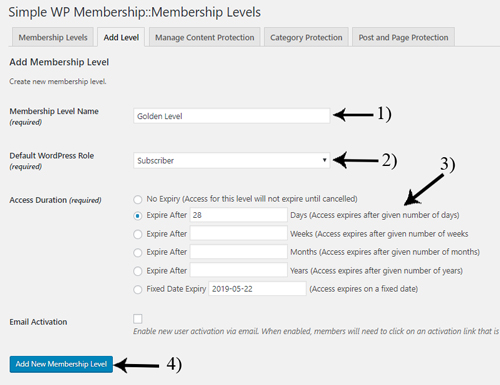
Creating Membership Levels in SWPM
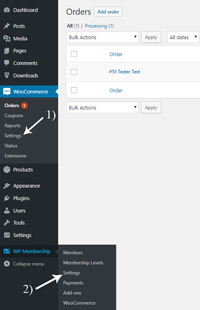
- Click on the ‘WP Membership‘, ‘Membership Levels‘ menu.
- Click the ‘Add New‘ button.
- Configure the membership level. The membership level will determine the type of access the customer will have (generally a subscriber) and the duration of the access.
- Click the ‘Add New Membership Level‘ button.
- You have now created a membership level.
Protecting Your WordPress Content
You will now need to protect your premium content so that only those with memberships can view it. Content protection can be completed on a per page/post basis or on a category basis. The option to protect content can be found towards the bottom of any post or page. If you choose to protect your content, only those levels of membership with access will be able to view it.
Step 4) Creating a Membership Product
Now that we have created a membership level and protected the website content, it is now time to create a product in WooCommerce. This product will be the item the customer clicks on and pays for to gain access to your membership website.
- Click on the ‘WooCommerce Products‘ menu.
- Click the ‘Add New‘ button to create a new product.
- Give your product a ‘Name‘ and ‘Description‘ like you would for any other WooCommerce product.
- Within the ‘Payment for Simple Membership‘ section, choose the level of membership that the customer will receive after a successful purchase of this product.
- Add additional details to the product as needed. This may include a: ‘Price‘, ‘Image‘, ‘Tags‘ and ‘Category‘. This product may only be a membership or alternatively it can be a combination of a membership and a physical item all in one. Find out more about configuring an WooCommerce product here.
- Click the Publish button to create the product.
- Your product can now be found under the ‘WooCommerce Products‘ menu.

When creating a membership product with WooCommerce consider the following:
- Inventory: Am I selling a limited number of memberships or will I be selling an indefinite amount?
- Up-Selling and Cross-Selling: Do I wish to offer other memberships on the website that I can then up-sell or cross-sell to my customers?
- Purchase Notes: Do I need to explain details to the customer after they purchase the membership?
- Membership Level: If a customer purchases this product and is already apart of another level, their account will be upgraded.
Step 5) Ensure Integration Setup is Complete
We have now completed the required plugin settings, created a membership level, protected content and created a product that a customer can click on to purchase the membership. The last step is to ensure that the integration addon is configured appropriately for the website.
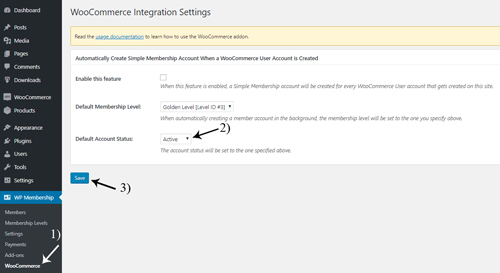
- Click on ‘WP Membership‘ and then on ‘WooCommerce‘.
- If you wish for your paid customers to be sent a registration link after purchase and only paid customers of the membership product to have access to the website, ensure you leave the checkbox unmarked.
- Choose a default account status for those who purchase an WooCommerce membership product. Generally it should be active unless you wish to verify each customer individually.
- Click the ‘Save‘ button.
- You have now created a membership which can be paid for and handled by WooCommerce.
How Can My Customers Purchase a Membership Handled by WooCommerce?
If you have completed the setup instructions above, you will have a membership product. Your customers will be able to purchase this product via the WooCommerce payment gateway you have chosen. The customer will then be sent a registration link to complete their membership profile after a successful purchase.
Step 1 and 2) Customer lands on your WooCommerce product’s page, clicks the ‘Add to Cart‘ button and then ‘Views Cart‘.

Step 3) The customer then ‘Proceeds to Checkout‘ with the product in their cart.

Step 4 and 5) The customer fills in their details and proceeds to pay with the payment gateway you have specified in the WooCommerce settings. The email that your customer specifies within the ‘Email Address‘ field, is the email where the registration link will be sent.

Step 6) The customers order is received. In the background, WooCommerce sends a notifications to the WooCommerce Integration Addon.

Step 7) An email containing the registration link is sent to the customers email address. A receipt from WooCommerce is also sent.

Step 8 and 9) The customer uses the registration form to fill in their member details. They can choose a username and password. They then click register.

Step 10) The registration of the member is now complete. They will be automatically logged in to the site or they will need to login. They will be able to view protected content intended for their level.

Viewing a New Member After an WooCommerce Payment as Admin
Once a customer has purchased a membership from an WooCommerce product, admin will see a new Order under WooCommerce and they will be able to see the new member under the WP Membership Members menu.
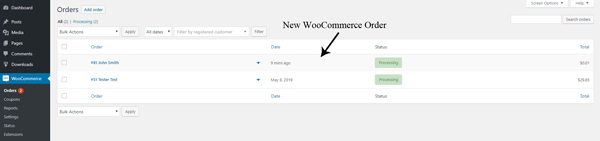

Admin will also receive an email from WooCommerce letting them know of the order.
Interested in getting the WooCommerce Integration Addon? See more details on the addon from our documentation page.