The form builder addon allows you to fully customize the fields that appear on the Registration and Edit Profile Form/Page of your membership site.
If you need to customize the registration form and collect various custom data from your members when they signup for a membership account then this addon is what you need.
You will be able to create registration and edit profile forms with custom fields for each of your membership levels. This allows you to collect different custom data for different membership levels.
Table of Contents
- Getting the Addon
- Installing the Form Builder Addon
- Form Builder Addon Usage
- Registration Form Example
- Edit Profile Form
- Using Read-Only Fields
- How to Use ‘Admin-Only’ Fields
- Enabling the Use Email Address as the Username Feature
- Using Google Captcha with Form Builder
- Customizing the Registration Success Message
- Using File Upload Type Fields
- After Registration Redirect When Using Form Builder
- Viewing the Custom Fields Data
- Adding the Custom Fields Array to the Notification Email
- Get the Form Builder Addon
- Addon Bundle Deal
Getting the Addon
The Form Builder is a premium addon, available for purchase at the bottom of this page. We recommend reviewing the full details on this page to understand its features and ensure it meets your needs before making a purchase.
Installing the Form Builder Addon
- Click on the “Add New” menu under the plugins interface.
- Go to the “Uploader” tab and upload the swpm-form-builder.zip file
- Hit the “Install Now” button and then activate the addon.
Form Builder Addon Usage
Note: Before activating and configuring the Form Builder addon, ensure that the main Simple Membership plugin’s registration and profile forms are working correctly. This addon will replace the standard registration and profile forms with the custom ones you create.
After installing and activating the addon, simply create your custom registration and edit profile forms for your membership levels and customize the fields as needed. The plugin will handle everything else.
Go through the following few steps to start using the addon.
Step 1) Access the Addon’s Admin Interface
In order to use the addon, go to the form builder link from the simple membership admin dashboard menu.

Step 2) Create a Custom Form
You can create custom forms for each of your membership levels or you can just have ONE form for ALL your levels.
In the beginning, it is a good idea to create one form that will catch all your levels. Later you can create membership level specific forms (if you need to).
Each custom registration form must have a corresponding edit profile form. The registration form appears on your registration page, while the profile form is displayed on the edit profile page. When you create a registration form, the addon automatically generates the associated edit profile form.
To get started, let’s create a new ‘All levels’ registration type form and see how it works.
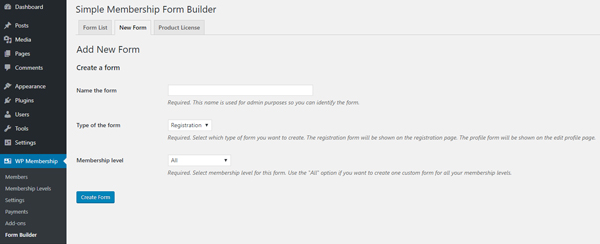
Click on the “New Form” link to create a new custom form:

Give the form a name (example: All Levels Registration Form). Choose the type of form to create (registration form or profile form). Choose which membership level(s) this form should apply to.
Step 3) Customize the Form Fields
After clicking the ‘Create Form‘ button, you’ll enter the form customization interface. This automatically generates a basic form with the minimum mandatory fields required for our plugin to function. The following fields are essential:
- Username
- Password
- Membership Level
You can visually add or remove custom fields to the registration or profile form you are creating.
Initially, it is a good idea to have a few simple fields just to test things out so you can see how it works. Later you can edit the form and customize it more.

You can add the following types of fields to your custom form to collect details from your members. The fields are categorized into two groups: Standard and Custom.

You will also be able to customize various details of the fields that you add to the form.
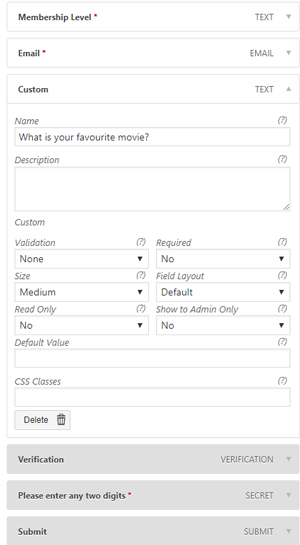
- You can make a field *required* for your members
- A ‘Read Only’ field meaning an answer can not be submitted
- A field that is only shown to admin
You can view the different custom field properties in the screenshot below:
Step 4) Save the Form
Click the ‘Save Form‘ button after you are done customizing the form fields. This can be found in the bottom right-hand corner of the page.
Step 5) Ensure the Presence of a ‘Profile’ Type Form
When you create a new ‘registration’ type form for a membership level, the addon automatically generates a corresponding ‘profile’ type form for that level in the background. You can customize this form by adding or removing fields.
Each custom form you create should have a pair:
- The registration form used on the registration page.
- The profile form used on the edit profile page.
It is crucial not to delete the profile form to ensure proper functionality.
For most sites, you will only need to edit the registration form. The edit profile form will mirror the registration fields.
This architecture provides flexibility for site admins to customize and display slightly different fields on the registration and edit profile forms if desired.
Step 6) Viewing the Custom Form on the Registration Page
When the users go to the registration page to register for a membership account, they will see the custom form that you configured according to their membership level.
If your site does not already offer a free membership option, you can temporarily enable it. This allows you to view the registration page and see how the custom form appears.
Note: Editing the shortcode on the registration page is not necessary. This addon functions with the standard registration page, which was automatically created by the Simple Membership plugin upon installation. The plugin knows which registration form to display based on the membership level (when they make the payment). You don’t need to edit any shortcode.
Registration Form Example
The registration form created with the form builder addon will appear as shown in the following example, using the default WordPress Twenty Twenty-Four theme. Note that it may appear slightly different depending on your theme.

Edit Profile Form
When you create a new registration form for a membership level, the addon automatically generates a corresponding edit profile form for that level in the background. You can customize this form by adding or removing fields.
Check the forms list menu to ensure that each membership level has an associated ‘profile type’ form. If not, create one.
The fields in the profile form should closely match those in the registration form for consistency. However, you may add additional custom fields to the profile form to collect more information from members via the edit profile page.
Note: There is no need to edit the profile page shortcode. This extension functions with the standard edit profile page created by the Simple Membership plugin upon installation. The plugin automatically displays the appropriate profile based on the user’s membership level upon login, eliminating the need to modify any shortcode.
Using Read-Only Fields
You may want to show some text to your members that you don’t want them to be able to edit. You can mark a text or text area field to be “read-only”. You (the site admin) can enter value in that field by editing the members profile from the admin area.

How to Use ‘Admin-Only’ Fields
You can designate a text or text area field as visible only to the admin; members will not be able to see this field on their profile editing page. This feature is useful for saving administrative notes about a member within their profile.
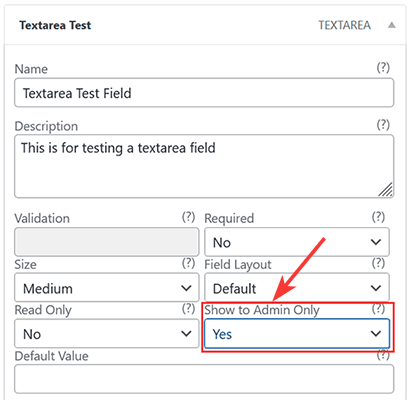
Note: Currently, the admin-only fields feature is available only for text and text area type fields.
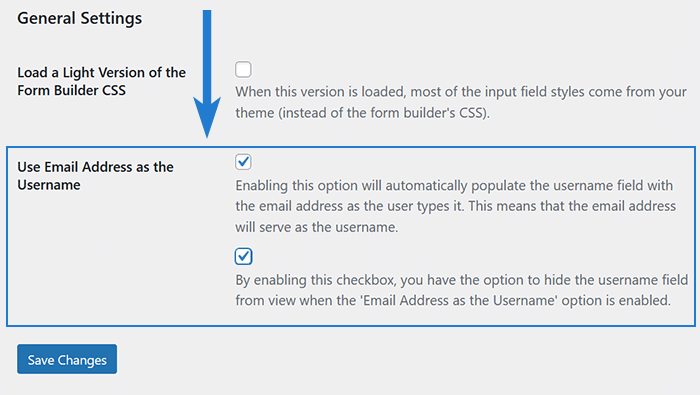
Enabling the Use Email Address as the Username Feature
If you wish to force your members to use their email address as their username (meaning the username will be the same as the email address) then you can enable this feature in the form builder addon’s settings.
Using Google Captcha with Form Builder
You can use our free google captcha addon to show captcha verification on the registration form.
When you enable and configure the captcha addon, the form builder registration form will show the captcha to your visitors (see the example screenshot below).

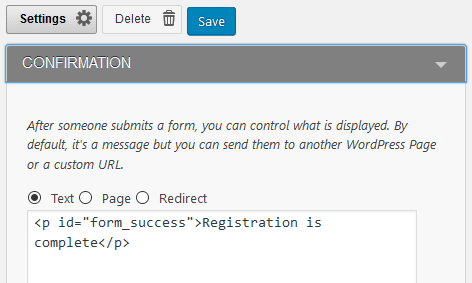
Customizing the Registration Success Message
If you want to customize the text that is displayed to the members after they successfully submit the registration form, you can do so by editing the form’s confirmation message.
Edit the custom form in question then enter your message in the “Confirmation” field.
Using File Upload Type Fields
There is an option to use File Upload type fields to allow users to upload files. The uploaded files are stored in the WordPress media library of your site. You can see a list of files uploaded by the member in the member’s profile edit interface.
Note: when using the file upload type fields, use the Accepted File Extensions field to configure which types of files you will accept (for security reasons).

After Registration Redirect When Using Form Builder
If you wish to redirect your users after they submit their form, please see the following documentation.
Viewing the Custom Fields Data
The members can view the data that they have filled in by going to the “edit profile” page. They can update the data from that page also.
The admin of the site can view the member’s custom data by editing a member’s profile from the “members” menu of the admin dashboard. The following is an example screenshot showing how the custom fields look like inside your admin dashboard (when you edit a member’s profile):

Adding the Custom Fields Array to the Notification Email
The best way to view the custom field values entered by a user is to log into your admin dashboard and access the member’s profile from the Members menu. This ensures the fields are displayed in a human-readable format.
Alternatively, you can use the following email merge tag to include an array containing all custom field values in the email. This provides a raw dump of the submitted custom fields, which may be useful for site admins to quickly review the entered data.
{raw_custom_fields}
Note: The custom field-related email merge tags only work in the ‘Registration Complete’ email when the email activation feature is not enabled. If the email activation feature is enabled, it’s best to view the custom fields directly in your admin dashboard.
The addon also supports the following email merge tag:
{raw_custom_fields_N}
Here, N represents the field number.
For example, you can use the following tags to retrieve specific custom field values:
{raw_custom_fields_1}
{raw_custom_fields_2}
{raw_custom_fields_3}
Get the Form Builder Addon
This is a one-time payment (includes 1 year of support and updates).
Addon Bundle Deal

Form Builder + Member Directory Listing
Single Site
Full Price: $87
Discounted Price: $69