If you are setting up a membership site using the Simple Membership Plugin and wish to offer ‘free‘ accounts to potential users and want those users to verify their email then this documentation will come in handy.
The Simple Membership plugin offers an email activation feature (email verification) that can be beneficial in cases where you receive free registrations with fake email addresses for your free membership. Email activation simply means that the user will need to confirm their registration via email prior to being able to log into the site and view hidden content. This ensures that the member is using a valid email address.
Note: Email activation and manual approval are mutually exclusive options. Therefore, if you intend to utilize the manual approval process, do not activate the email activation feature.
Table of Contents
- Email Activation vs. Manual Approval
- Setting Up Email Activation for a Free Membership Level
- Redirecting Users After Email Activation
- The Flow of Registration with Email Activation Enabled
- What Happens if the User Tries to Log-in Prior to Activating their Account?
- Resend Account Activation Email
- Related Documentation
Email Activation vs. Manual Approval
Email Activation is a self-service process where the registering member receives an activation link via email. The member simply needs to click the link to activate their account—no admin intervention is required. This method ensures a smooth and automated onboarding experience.
Manual Approval, on the other hand, requires the site administrator to review and manually activate the member’s account before they can log in. This approach gives the admin control over who gains access but involves additional steps for the admin.
Email activation and manual approval are mutually exclusive options. If you intend to use the manual approval process, refer to the manual approval documentation for setup instructions.
Setting Up Email Activation for a Free Membership Level
Email activation is enabled on a membership level basis. This makes it possible to have it only enabled for free levels of membership.
Spam users can be limited by using this feature as all new members need to confirm their registration via email prior to logging in.
Step 1) Enabling Email Activation
- Click on the WP Membership menu and then on Membership Levels.
- Click the Edit button for your Free Membership Level (or another level that you wish to enable email activation for).
- You will see the heading: Email Activation. Mark the checkbox to enable email activation for that level.
- Ensure you click the Save Membership Level button prior to exiting the page.
- Ensure that your ‘From Email Address’ in the email settings menu is correct. This is a vital step because this will determine if emails are sent from your server or not. If you find that you are having email sending issues, please review this forum post.
- All members that now register for that free level will need to confirm their account by clicking the unique link sent to their email.

Step 2) Editing the Activation Email Message
The email activation message sent to your new members after registration can be edited. This email can be edited from the WP Membership Settings menu.
- Click on the Settings menu found under the WP Membership Plugin.
- Choose the Email Settings tab.
- Ensure that your From Email Address is correct. It should follow this format:
Your Name <support@your-domain.com> - Scroll to the bottom of the Email Settings page. You will see the settings for Email Activation.
- Edit the Email Subject and Email Body to suit the membership level that you have enabled email activation for.
- Click the Save Changes button once you are happy with your activation email subject and body.
Note: Do not remove the action link merge tag {activation_link} as this is what will generate the unique link needed for the member to activate the account.

Email merge tags can be used in the activation body text. These can be copied from the following documentation.
Redirecting Users After Email Activation
You can optionally redirect the users to a specific page after they successfully activate the account by clicking on the email activation link.
To use this feature, specify the redirection URL in the After Email Activation Redirection Page field when configuring the membership level.

The Flow of Registration with Email Activation Enabled
Your visitors will experience the following when you use the email activation feature.
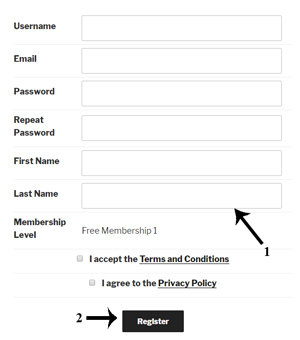
Step 1) The potential member comes to the site and uses the free registration form to register.
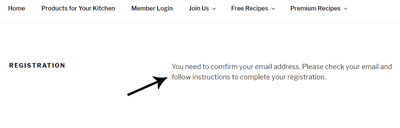
Step 2) They are prompted to check their email for the activation link. At this point in the admin dashboard, this users account status is ‘Activation Pending‘. They cannot log into the site without completing the next step.
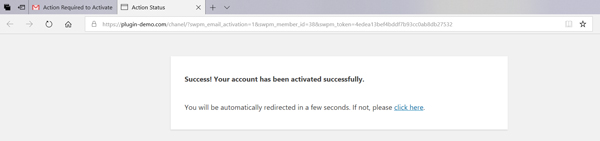
Step 3) The user logs into their email that they used in the registration form and clicks on the activation link.

Step 4) They are notified that their account has been activated and they are redirected to the login page.
Step 5) Their account in the admin dashboard now changes from ‘Activation Pending’ to ‘Active’.
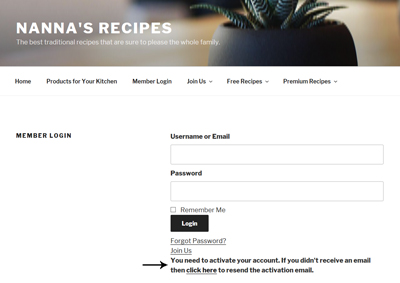
What Happens if the User Tries to Log-in Prior to Activating their Account?
If a potential member signs up with your registration form and attempts to login prior to clicking the activation link they will be notified to check their email. At this stage they can also generate a new activation email as it may have been lost or ended up in the spam box.
Resend Account Activation Email
If a member did not receive the original account activation email, they have the option to resend it themselves.
Additionally, the site admin can manually resend the activation email from the Tools menu of the plugin. Look for the section titled “Resend Activation Email To” to send the activation email to specific members.
Related Documentation
Refer to the Membership Levels documentation for details on all other membership level configuration options.