The Google reCAPTCHA Enterprise feature allows you to protect your Simple Membership registration and login pages from bots.
The Google Enterprise reCAPTCHA uses Google Cloud. So you will need to create a free Google cloud account for it.
When you enable this feature, the captcha option will appear on the Simple Membership registration form and login form. Users will simply need to check a box that confirms they are human. This prevents robots from abusing the registration and login forms on your site.
Table of Contents
- Download The Addon
- Configuring Enterprise reCAPTCHA on Your Website
- Registration Form Example with reCAPTCHA Enterprise
- Disable the ‘Anyone Can Register’ Option of WordPress
Download The Addon
Click here to download the free Simple Membership Google reCAPTCHA Enterprise addon.
Configuring Enterprise reCAPTCHA on Your Website
Follow the steps below to configure Enterprise reCAPTCHA for your site:
- Click on the WP Membership -> Settings menu.
- Click on the Addons Settings tab.
- Enter your Google Enterprise reCAPTCHA API details.

Step 1 – Setup a Google Cloud Project
You will need to do this step if you have not already setup a project in your Google Cloud Console Account
You can create a separate project for each of your sites or use the same project for multiple sites.
The following screenshot will show you how to set-up a project in your Google Cloud Account.
If you don’t have a project already then create a new project by clicking on the New Project Button. See the following screenshot.
You can use any simple name for the project. The rest of the details are optional.

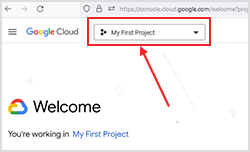
After the project is created, select the newly created project and do the following steps to enable reCAPTCHA Enterprise and get your API details.
Step 2 – Create Your reCAPTCHA Enterprise Key ID
The following steps outline how to create and get your reCAPTCHA Enterprise key.
You will need to log into the Google Cloud Console and do the following.
- In the Navigation Menu (Left side of the screen)
- Click on Security
- Click reCAPTCHA Enterprise

Once you have navigated to the reCAPTCHA Enterprise dashboard in your Google Cloud account, create the key for your site.
Click on the CREATE KEY button

Fill in the details to generate a Key for Enterprise reCAPTCHA.
- Display Name (This can be anything you want it to be)
- Platform (Website)
- Add Domain (Your domain name)
- Click Create Key

Add the reCAPTCHA Key ID to the Addon’s Settings Menu
Once you have created your reCAPTCHA Enterprise key, copy and paste it into the settings menu of the reCAPTCHA Enterprise addon.
Click on the WP Membership -> Settings menu > Addons Settings
Copy and paste the newly created reCAPTCHA Key ID from your Google Cloud console to the settings menu of the addon

Step 3 – Create the API Key for Your Google Cloud Project
The following steps will guide you on how to create and obtain the Google Cloud project’s API credential and add it to the addon’s settings menu.
Navigate to the API Credentials menu
- Click on the Google Clouds menu (hamburger menu)
- APIs & Services -> Credentials

Create an API Key for Your Project
Create an API key for your Google cloud project.
Click on the Create Credentials button then click on API key to generate an API key.

Add the API Key to the Addon’s Settings Menu
Now that you have generated the API key, add it to the plugin’s settings.
Copy and paste the API key from your Google Cloud console to the addon’s settings menu.

Step 4 – Get the Project ID of Your Google Cloud Project
Next, find the Project ID in your Google Cloud Console and add it to the plugin. The following steps will explain how to do this.
Click on the project selection drop-down. It will show all the projects and their IDs. You can copy & paste the project ID from this interface.

Add the Project ID to the Addon’s Settings Menu
Now that you have copied the Project ID, add it to the plugin.
Copy and paste the Project ID from your Google Cloud console to the Simple Membership Plugin.

Step 5 – Save The Settings
Now that you have added all the necessary details to set up Google reCAPTCHA Enterprise on your site, save your settings in the plugin.
You can enable the captcha on the registration page and/or the login page by checking the appropriate options.
Click the “Save Changes” button at the bottom of the Google reCAPTCHA Enterprise Addon Settings page.
Registration Form Example with reCAPTCHA Enterprise
When reCAPTCHA Enterprise is enabled, the reCAPTCHA icon will appear at the bottom of the registration page, as shown in the following screenshot. The presence of this reCAPTCHA logo indicates that the reCAPTCHA library is active and captcha checks are being applied to the page.

Disable the ‘Anyone Can Register’ Option of WordPress
WordPress has an option that allows anyone to go to WordPress’s registration page and create a WP user account. This WordPress feature can open your site up for spam user registration. If you had previously enabled this option, you should disable it.
To learn how to turn off the Anyone Can Register feature, you can refer to this tutorial.